Dynamic assets in Flash an overview
Flash has a fairly restricted range of asset types it can use and is also inflexible about preloading some types of files (sounds and digital videos need a different technique). Browser-based Flash is also unable to investigate file systems at all so that loading all files from a folder on a local device requires the Adobe Integrated Runtime (AIR) environment (for local files) or php (for files on a server).
Example 1 an automatic slideshow
The following example uses a custom AssetManager class to load and hold external images from a given list (this will be supplied by a configuration file in future examples). It uses the Loader class introduced in AS3 and shows how to react to load events and errors.
In this example, we will load our images and then use the simple timer object to cause images to switch at a regular interval.
Further developments
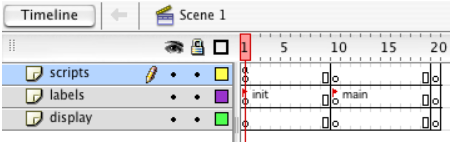
- Make a new movie and create 2 extra layers, naming them scripts, labels, and display.
- Select frame 10 in all of your layers and then choose Blank Keyframe from the Insert menu.
- Do the same for frame 20.
- Select Frame 1 of the labels layer and then, using the Frame palette, give it the label init.
- Select Frame 10 of the labels layer and give that the label main.
- Lock the scripts and labels layers. Your timeline should look something like this: -
- Save your movie as slideshow_auto.fla in a new project folder.
- Choose New from the file menu and then select ActionScript File. This opens a new .as external script file the only place you are allowed to create classes.
- Carefully type the following: -
- Save the file as AssetManager.as in the same folder that the flash movie is in. Make sure the file name is exactly the same as the Class name.
- In the folder make a new folder called images and put 3 jpg files in it.
- Select Frame 1 of the scripts layer. In the Actions panel type the following (you will need to change the image file names for those you are using); -
- Select Frame 3 of the scripts layer and insert a blank Keyframe.
- In the actions panel, type the following:-
- Select the display layer at frame 10.
- Using the rectangle tool, draw an empty (i.e. non-filled) rectangle around the edge of your stage.
- Select the frame actions for Frame 10 of the scripts layer. Type the following: -
- Check your code syntax and close the Actions pane. Your movie is finished.
- Test it by pressing the CONTROL and ENTER keys together.
package {
import flash.display.*;
import flash.events.*;
import flash.errors.*;
import flash.net.URLRequest;
public class AssetManager {
// a class to hold external assets and manage loading
// assets' references are held in an array
// *** properties ***
var assets:Array;
// *** methods ***
// the constructor function
public function AssetManager() {
// set up the array
assets = new Array();
}
// loads an asset from a given location
public function addAsset(fileName:String):int {
// make a loader for the asset
var loader:Loader = new Loader();
// set an event listener for loading error events
loader.contentLoaderInfo.addEventListener(IOErrorEvent.IO_ERROR, ioerrorListener);
// set an event listener for load progress events
loader.contentLoaderInfo.addEventListener(ProgressEvent.PROGRESS, progressListener);
// set an event listener for load complete event
loader.contentLoaderInfo.addEventListener(Event.COMPLETE,completeListener);
// try the load
try {
loader.load(new URLRequest(fileName));
// save the loader if load was allowed|
assets.push(loader);
return assets.length - 1;
} catch (e:SecurityError) {
// strying to load from a forbidden source
trace("AssetManager: Security Error - Not allowed to load file "+fileName);
}
return -1;
}
private function ioerrorListener(e:IOErrorEvent):void {
trace("AsssetManager: Error - could not load a file");
// find the Loader that couldn't load file and delete it
for (var i:Number = 0; i<getAssetCount(); i++) {
var info:LoaderInfo = assets[i].contentLoaderInfo;
if (info== e.target) {
assets[i]=null;
}
}
}
private function progressListener(e:ProgressEvent):void {
// you could display the progress of the download here
}
private function completeListener(e:Event):void {
trace("AssetManager: Info - load complete for "+e.target.url);
}
// tests if all assets have loaded yet
public function loaded():Boolean {
var loadDone:Boolean = true;
// go through each in turn using a loop
for (var i:Number = 0; i<getAssetCount(); i++) {
if (assets[i]!=null) {
var info:LoaderInfo = assets[i].contentLoaderInfo;
// if the load is not complete, switch variable
if (info.bytesLoaded != info.bytesTotal) {
loadDone = false;
}
}
}
return loadDone;
}
// gets an asset based on its number
public function getAsset(id:Number):* {
// send back the asset in that position in the array
if (assets[id]!=null){
return Loader(assets[id]).content;
}
// or null if it didn't load
return null;
}
// returns the number of assets
public function getAssetCount():Number {
// send back the number of assets
return assets.length;
}
}
}
// script for init
// make a new asset manager
var pics:AssetManager = new AssetManager();
// load 3 images
// change the file names to those of your images
pics.addAsset("images/impact.jpg");
pics.addAsset("images/iss.jpg");
pics.addAsset("images/titan.jpg");
// see if all the assets have loaded yet
if (pics.loaded()) {
// all loaded, go on
this.gotoAndPlay("main");
} else {
// not yet, wait for loading to finish
this.gotoAndPlay(2);
}
// script for main
// make a new Timer with an interval of 3 seconds
var timer:Timer = new Timer(3000, 0);
// addd an Event Listener for timer events
timer.addEventListener(TimerEvent.TIMER,timerListener);
// set the first image number
var curImage:Number = 0;
// set up the first image
curImage--;
// check starting image has loaded
getNextLoaded();
setUpClip(pics.getAsset(curImage));
// start the timer
timer.start();
// hold the movie here
stop();
// the update function which is called by the timer
function timerListener(e:TimerEvent):void {
//hide the last picture
removeChild(pics.getAsset(curImage));
getNextLoaded();
// set up this image
setUpClip(pics.getAsset(curImage));
}
// resizes an asset to the same dimensions as the stage
function setUpClip(myAsset:*):void {
// set to the same size as the stage
myAsset.height = this.stage.height;
myAsset.width = this.stage.width;
this.addChild(myAsset);
}
function getNextLoaded():void{
// get the next loaded image's number
do {
curImage++;
if (curImage>=pics.getAssetCount()) {
curImage = 0;
}
} while (pics.getAsset(curImage)==null);
}
Look at how I check if the images are completely loaded in the loaded() function in the AssetManager. It would be nice to have another similar function in our asset manager which returned the percentage loaded when it was called. See if you can add this and then use it to give feedback to the user on how the asset download is going either by text or by a progress bar.
This page was last updated on 31st October 2013